


Product FAQs
How to remove glitter polish
Glitter nails look amazing but can be a real nightmare to remove.
Here’s how to make the process a little easier.
- 1. Buff to break the seal with our Buffing Block.
Too much buffing can damage the nail, but you want to get the first layer off and rough up the polish a little to allow the remover to penetrate the polish.
- 2. Grab your Nail Polish Remover Pot*.
Simply dip your finger in the pot and gently twist leaving in for the count of 10. Once the majority of glitter is off your nails, give your nails a good wash with soap to get rid of the loose glitter on your skin. We recommend labelling your NPR pot as glitter only.
*The Nail Polish Remover Pot is a manicure must-have and removes polish in seconds with no need for cotton wool. The acetone-free, collagen-rich formula is gentle on the nail, removing polish whilst helping to promote nail strength, growth and cell renewal.
- 3. Hydrate and repair with NailKale Superfood Base Coat* and Superfood Cuticle Repair Oil*
Paint your NailKale Superfood Base Coat* using the lid as a secure finger rest. Then finish off with Superfood Cuticle Repair Oil*. Gently massage the oil into the nail and cuticle twice weekly for maximum care and repair.
* NailKale Superfood Base Coat is a powerful and deeply nourishing treatment packed full of vitamins A, C, E, F and H. Formulated with keratin to harden and activate the stimulation of nail growth. NailKale also acts as an anti-breakage and anti-splitting shield. Dermatologically tested to brighten and smooth nails with extracts of aloe vera, lemon, ginseng, pomegranate and grape. Let your nails drink up the goodness under your polish or style it out alone for glossy naked nails.
* Superfood Cuticle Repair Oil contains the perfect moisturising blend of 5 reviving oils - argan oil, sweet almond, castor oil, soybean and rosehip oil. Each natural oil has been selected to offer caring benefits to encourage healthy nails and cuticles.
How to make polish dry quicker
Are you tired of waiting for nail polish to dry? It always smudges and have to re-paint it again with only have 5 minutes before you dash out the door… we’ve all been there.
Take a moment to try our bestselling 45 Second Top Coat Formula.
It’s a quick fix to a super glossy, high shine manicure that really is touch dry in 45 seconds. Powered by Retinol it is the perfect top coat for anyone who demands stronger, healthier nails. The retinol builds a chip proof shield locking in the colour and sealing it with a glossy, professional finish. 100% Vegan and Cruelty Free. Just what your nail colour needs.
How to remove gel nails
You’ve had your gel manicure on for a couple of weeks and now your bored of the colour. Follow the next steps to remove your gel manicure with our at-home simple ‘Gel Less’ removal kit.
- 1. Prep is key
Firstly file and buff the first layer of your gels away. Repeat across every nail until the gel has got a matte look. The more you buff the less time you will have to soak in the acetone. (The thicker the gel the longer the buffing time)
- 2. Remove the gel
Pour the conditioning acetone into the remover pot and place your hands inside. After 10 minutes brush your nails against the bristles inside the pot to remove the gel. Remove any stubborn remaining gel with a cuticle pusher or orange stick and repeat until all the gel has been successfully removed. Give you hands a rinse afterwards.
- 3. Hydrate and recover
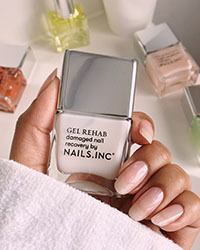
Next paint your nails with our revolutionary treatment, Gel Rehab* using the lid as a secure finger rest. Then finish off with Superfood Cuticle Repair Oil*. Gently massage the oil into the nail and cuticle twice weekly for maximum care and repair.
*Gel Rehab treatment is perfect for dry & damaged nails. Use between gel manicures to rehydrate your nails in just 30 minutes. 82% of users said their nails were harder & less fragile. This miracle 10-in-1 treatment and base coat contains keratin rich spinach, seaweed extract, peptides, nitrocellulose and kale, working to strengthen, regenerate and hydrate nails, preventing against further breakage and damage.
* Superfood Cuticle Repair Oil contains the perfect moisturising blend of 5 reviving oils - argan oil, sweet almond, castor oil, soybean and rosehip oil. Each natural oil has been selected to offer caring benefits to encourage healthy nails and cuticles.
How to grow your nails faster
If you want your nails to grow faster here are a couple of tips and tricks to keep them healthy and strong.
- 1. Choose an acetone free option
When removing your nail polish, always opt for an acetone free option.
Our Nail polish remover pot is a great example of an acetone-free and collagen-rich formula. It is gentle on the nail, removing polish whilst helping to promote nail strength, growth and cell renewal.
- 2. Take care when buffing
The way you buff your nails is so important. Avoid aggressive filling. Always file your nails in one direction with minimal pressure. This will avoid stressing the nail and causing a breakage or peeling.
- 3. Try a nail recovery treatment
Vitamin-rich nail treatments are vital to you nail recovery time. Using regular treatments help to improve overall nail health. Try Back To Life - an intense treatment and tinted base coat which delivers relief to damaged nails, particularly nails damaged by gel manicures. The difference? The formula is like skincare but for nails, infused with apricot, avocado, coconut and purple passionflower pink to blur imperfections - expect a flawless, natural finish.
- 4. Your cuticles need love too
Always finish off with Superfood Cuticle Repair Oil which contains the perfect moisturising blend of 5 reviving oils - argan oil, sweet almond, castor oil, soybean and rosehip oil. Each natural oil has been selected to offer caring benefits to encourage healthy nails and cuticles. Gently massage the oil into the nail and cuticle twice weekly for maximum care and repair.
How to recreate a French Manicure
This look has been splashed across the pages of every nail inspo board on pinterest and you have probably saved it at least once on insta. We are taking a trip back to the 90s to recreate the perfect French manicure. This look can also be switched up for a modern take by creating a thinner white tip or perhaps take a couple of different shades and create a minimal gradient French rainbow.
- 1. First, apply your base coat. Back To Life* works perfectly as it is slightly tinted pale pink. The base coat also doubles as an intensive treatment.
- 2. Next take White Out, a pure white polish. Wipe off any excess polish from your brush before application. In short strokes create a soft V shape along your tip, softening the V as you go. Use the natural white of your nail to guide you.
- 3. If you want to create a slightly more modern look, simply make your white tip a lot thinner. You can also try this technique with any shade you like.
- 4. To seal and protect your polish colour apply Lacquer Lock. A revolutionary top coat that features sunlight curing technology, using natural UV rays to lock in your colour for extended wear for up to 14 days. The result - brilliant shine and glossy nails. Wear over any polish to create a longwear result that is resistant to breakage and chipping.
*Back To Life - an intense treatment and tinted base coat which delivers relief to damaged nails, particularly nails damaged by gel manicures. The difference? The formula is like skincare but for nails, infused with apricot, avocado, coconut and purple passion flower pink to blur imperfections - expect a flawless, natural finish.
How to create the perfect manicure (red and nude polish)
- 1. Remove Polish with our Express Nail Polish Remover Pot. This manicure miracle is the perfect way to remove stubborn nail polish in seconds. Simply dip and twist each finger in the pot and see the polish disappear. We have just welcome our Express Nail Polish Remover Pot for speedy pedicure removal too!
- 2. Next, take the Vitamin E Pen to care for your cuticles. This step is important as it replenishes dry cuticles with the vital nourishment needed to protect the nail bed.
- 3. Use the curved edge of the SOS Pen to push back your cuticles. Take the mini file on the lid to gently shape your nail, buffing in one direction.
- 4. Apply Back To Life, a tinted base coat and recovery treatment. (Our golden rule is to always wear a base coat as it preps your nails pre any nail polish). The base coat will create a smooth, flawless canvas ensuring perfect application and long wearing results.
- 5. Next, take the polish of your choice, don’t overload your brush with polish as this will add more drying time. The key is to build up thin layers of paint. The patented brush is designed to hug the shape of your nail, allowing one sweep from the top of the nail bed to the tip. Repeat this step twice.
- 6. To seal and protect your polish colour apply Lacquer Lock. A revolutionary top coat that features sunlight curing technology, using natural UV rays to lock in your colour for extended wear for up to 14 days. The result - brilliant shine and glossy nails. Wear over any polish to create a longwear result that is resistant to breakage and chipping.
- 7. Finally, use the nib of the SOS Pen to touch up any paint smudges to ensure a flawless manicure!
How to buff nails
Consider this nail buffing tool as your one-way ticket to beautiful nails, designed to buff, smooth ridges and boost shine. Follow these simple steps to prep your nails before adding a lick of paint, in preparation to achieve a flawless manicure.
- 1. First of all, take your Easy Filer and slide your fingers through the centre. This allows for the perfect hand position to accurately file and buff nails using the outside of the file.
- 2. Buff the nails on the opposite hand using the two different surfaces on the outside of the file. This will help remove any staining from the surface.
- 3. With your fingers still in the centre of the Easy Filer, use the inside of the file to shine your nails. This will remove any dullness and make your nail super shiny.
How to recreate tortoise shell nail art tutorial
We are all obsessed with animal print nail art right now, from cow print nails gracing the likes of Kendal Jenner and Ariana Grande to our fave look of the moment – Tortoiseshell! Follow our simplified tutorial on how to recreate the sassy tortoiseshell look. We promise all our nail tutorials have been road-tested on real humans and swear it can be done in a fuss free way with no technical tools! Get ready to try this roarsome nail art look.
- 1. You will need our ‘Coco For Real’ Chocolate Scented Nail Polish Duo, Black Taxi, Nailkale Base Coat and Lacquer Lock Top Coat.
- 2. Paint your NailKale Superfood Base Coat* using the lid as a secure finger rest.
* NailKale Superfood Base Coat is a powerful and deeply nourishing treatment packed full of vitamins A, C, E, F and H. Formulated with keratin to harden and activate the stimulation of nail growth. NailKale also acts as an anti-breakage and anti-splitting shield. Dermatologically tested to brighten and smooth nails with extracts of aloe vera, lemon, ginseng, pomegranate and grape. Let your nails drink up the goodness under your polish or style it out alone for glossy naked nails.
- 3. Apply one coat of I’m Fondue You a caramel foil shade from the Coco For Real Chocolate Duo to each nail – always seal the free edge.
- 4. Take 100% Hot Chocolate a dark brown. Wipe off any excess polish so it is fairly dry and start at the cuticle edge with small brushstrokes down the nail. Keeping it to the top third section of the nail.
- 5. Turning your nail on the side, start at the sidewall and paint across the nail. Creating patches of brown. Place the third brown section on the free edge working the polish up and along the nail to fill the space.
- 6. Take Black Taxi and place a dot in the centre of each brown section. Wipe the excess polish off the brush and lightly pull the black polish into the brown section. Use the side of the brush for extra control over the brushstrokes.
- 7. You may want to add some extra detailing. Follow the previous step by adding some black polish dots and blending out.
- 8. Grab your SOS Pen and touch up any paint smudges ready for the next step.
- 9. To seal and protect your polish colour apply Lacquer Lock. A revolutionary top coat that features sunlight curing technology, using natural UV rays to lock in your colour for extended wear for up to 14 days. The result - brilliant shine and glossy nails.
Wear over any polish to create a longwear result that is resistant to breakage and chipping.